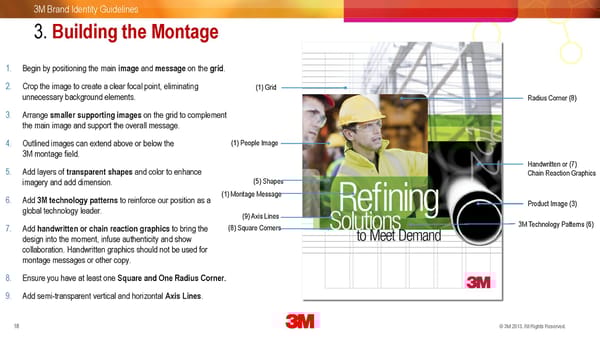
3M Brand Identity Guidelines 3. Building the Montage 1. Begin by positioning the main image and message on the grid. 2. Crop the image to create a clear focal point, eliminating (1) Grid unnecessary background elements. Radius Corner (8) 3. Arrange smaller supporting images on the grid to complement the main image and support the overall message. 4. Outlined images can extend above or below the (1) People Image 3M montage field. 5. Add layers of transparent shapes and color to enhance Handwritten or (7) Chain Reaction Graphics imagery and add dimension. (5) Shapes 6. Add 3M technology patterns to reinforce our position as a (1) Montage Message global technology leader. Product Image (3) (9) Axis Lines 7. Add handwritten or chain reaction graphics to bring the (8) Square Corners 3M Technology Patterns (6) design into the moment, infuse authenticity and show collaboration. Handwritten graphics should not be used for montage messages or other copy. 8. Ensure you have at least one Square and One Radius Corner. 9. Add semi-transparent vertical and horizontal Axis Lines. 18 3M Confidential. 30 Oc©to be3Mr 2013. All Rights Reserved.
 3M Brand Book Page 17 Page 19